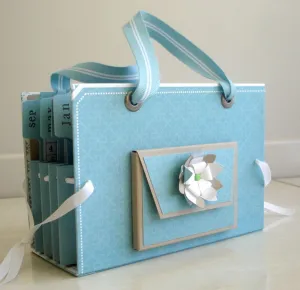
Card Organiser Tutorial
I haven’t had a chance to get my Card Organiser Tutorial done today and it doesn’t look good for me to get the chance before Christmas. But I have taken some measurements so for those that want to give it a go, this is what I used:
Main box frame
1 piece of thick card 12″ x 7″ scored 4 1/2″ from each end on the 12″ side – I used the backing card that came in the Designer Series Paper pack. This will get completely covered with paper and cardstock so don’t worry about what colour it is.
2 pieces of patterned paper 8″ x 5″ scored 1″ in on each of the four sides
2 pieces of patterned paper 1″ x 3″ scored at 1/2″.
1 piece of cardstock 11 3/4″ x 6 3/4″ scored 4 3/8 from each end on the long side. This will be stuck on the inside of the thick piece of card.
1 piece of cardstock 7″ x 3″
Stick the paper onto the front and back of the thick card and fold the edges over along the scored lines and stick down. Cover the white edges along the sides of the base with the 1″ x 3″ paper. Stick the 11 3/4″ x 6 3/4″ cardstock to the inside. Stick the 7″ x 3″ piece to bottom to cover the remaining thick card still showing and then you should have your main box frame.
Concertina sides and Dividers
2 pieces of cardstock 6″ 2 1/2″ scored at every 1/2″
5 pieces of cardstock 7 1/4″ x 2 1/2″ scored at 1/2″ on each end
Fold both pieces of the 6 1/2″ x 2 1/2″ cardstock to form a concertina. Stick one piece of 7 1/4″ x 2 1/2″ cardstock into one of the folds on one concertina and then stick the other end into the corresponding fold in the other concertina. Repeat for the other 4 dividers. Punch holes for the ribbon to be threaded through. Stick it to the main box frame and punch holes in each side of the box frame to correspond to those in the concertinas. Thread the ribbon through. Punch holes for the ribbon ‘handles’ and thread the ends through and tie in a knot. (I used jumbo brads as well before I put the ribbon in)
Index cards (for each month)
12 pieces of cardstock 6 1/4″ x 4″
12 “tabs” of cardstock (punched using the round tab punch from stampin’ up!)
Attach the tabs to the 6 1/4″ x 4″ cardstock. Stamp or write the month on each tab. You can then print out a table that has each date of the month on it and glue to the index card. You now have one basic card organiser that can be finished off however you like.
I added a pocket for postage stamps. These are just my measurements and I’m not even sure whether a little stamp booklet will fit in it. You may want to check for yourself.
1 piece of cardstock 4 1/2″ x 3″ scored at 1/4″ and 1/2″ ono the two short sides and only one long side.
1 piece of cardstock 4 1/2″ x 3 1/2″ scored at 1 3/4″ and 2″ along the long side.
1 piece patterned paper 3 1/4″ x 2 1/2″
1 piece of patterned paper 3 1/4″ x 1 1/2″
I also added a flower on the pocket to add a little something special.
Filed under: Uncategorized | 5 Comments
Tags: Card Organiser, Tutorial


This is amazing Amy. Thanks so much for the tutorial. I am definitely going to make one of these. Kris.
Thank you so much for sharing you lovely card organiser tutorial. I’m going straight to my craft room to make one before the new year comes in. Thank you again. Evonne
Wow! This is just adorable! I will be making one of these very soon! Thanks for sharing.
Mel xx
I’m glad that you all love it so much. It really is a fantastically easy project and you’ll have to send me some photos of your finished projects.
Happy creating,
Amy
Lovely project, thanks for the measurements! Hope life gets easier for you soon!